> ## Documentation Index
> Fetch the complete documentation index at: https://doc2.payloco.com/llms.txt
> Use this file to discover all available pages before exploring further.
# 异步通知签名
> 异步通知签名验证指南,包含创建 webhook 订阅、响应 webhook 事件、验证签名和 IP 白名单等内容。
# 监听 webhook 事件
创建 webhook 订阅,配置你的端点以响应并验证签名,并将 Payloco IP 加入白名单,以便接收 webhook 通知。有关 webhook 工作原理、投递行为和安全性的概述,请参阅 [Webhooks 概述](https://www.payloco.com/docs/developer-tools/webhooks/webhooks-overview.md)。
## 开始之前
你需要拥有 [Payloco Web 应用](https://global.payloco.com/) 的开发者、管理员或所有者角色权限。
## 创建 webhook 订阅
你可以通过注册通知 URL 并选择要接收的事件来订阅 webhook。当这些事件中的某个在你的账户中发生时,Payloco 会通过 HTTP POST 将 JSON 有效负载发送到你的 URL。
创建 webhook 订阅的步骤:
1. 登录 [Payloco Web 应用](https://global.payloco.com/) ,选择 **开发者** > **Webhooks**。
2. 点击 **New webhook**,配置通知 URL 和要监听的事件。
3. 在 **Create webhook** 页面填写以下信息。
* **Name**:你的 webhook 订阅名称。
* **Notification URL**:用于接收 webhook 通知的 URL。
* **API version**:webhook 使用的 API 版本,决定你收到的通知结构,包括事件名称和负载字段。默认情况下,它设置为账户已配置的 API 版本。
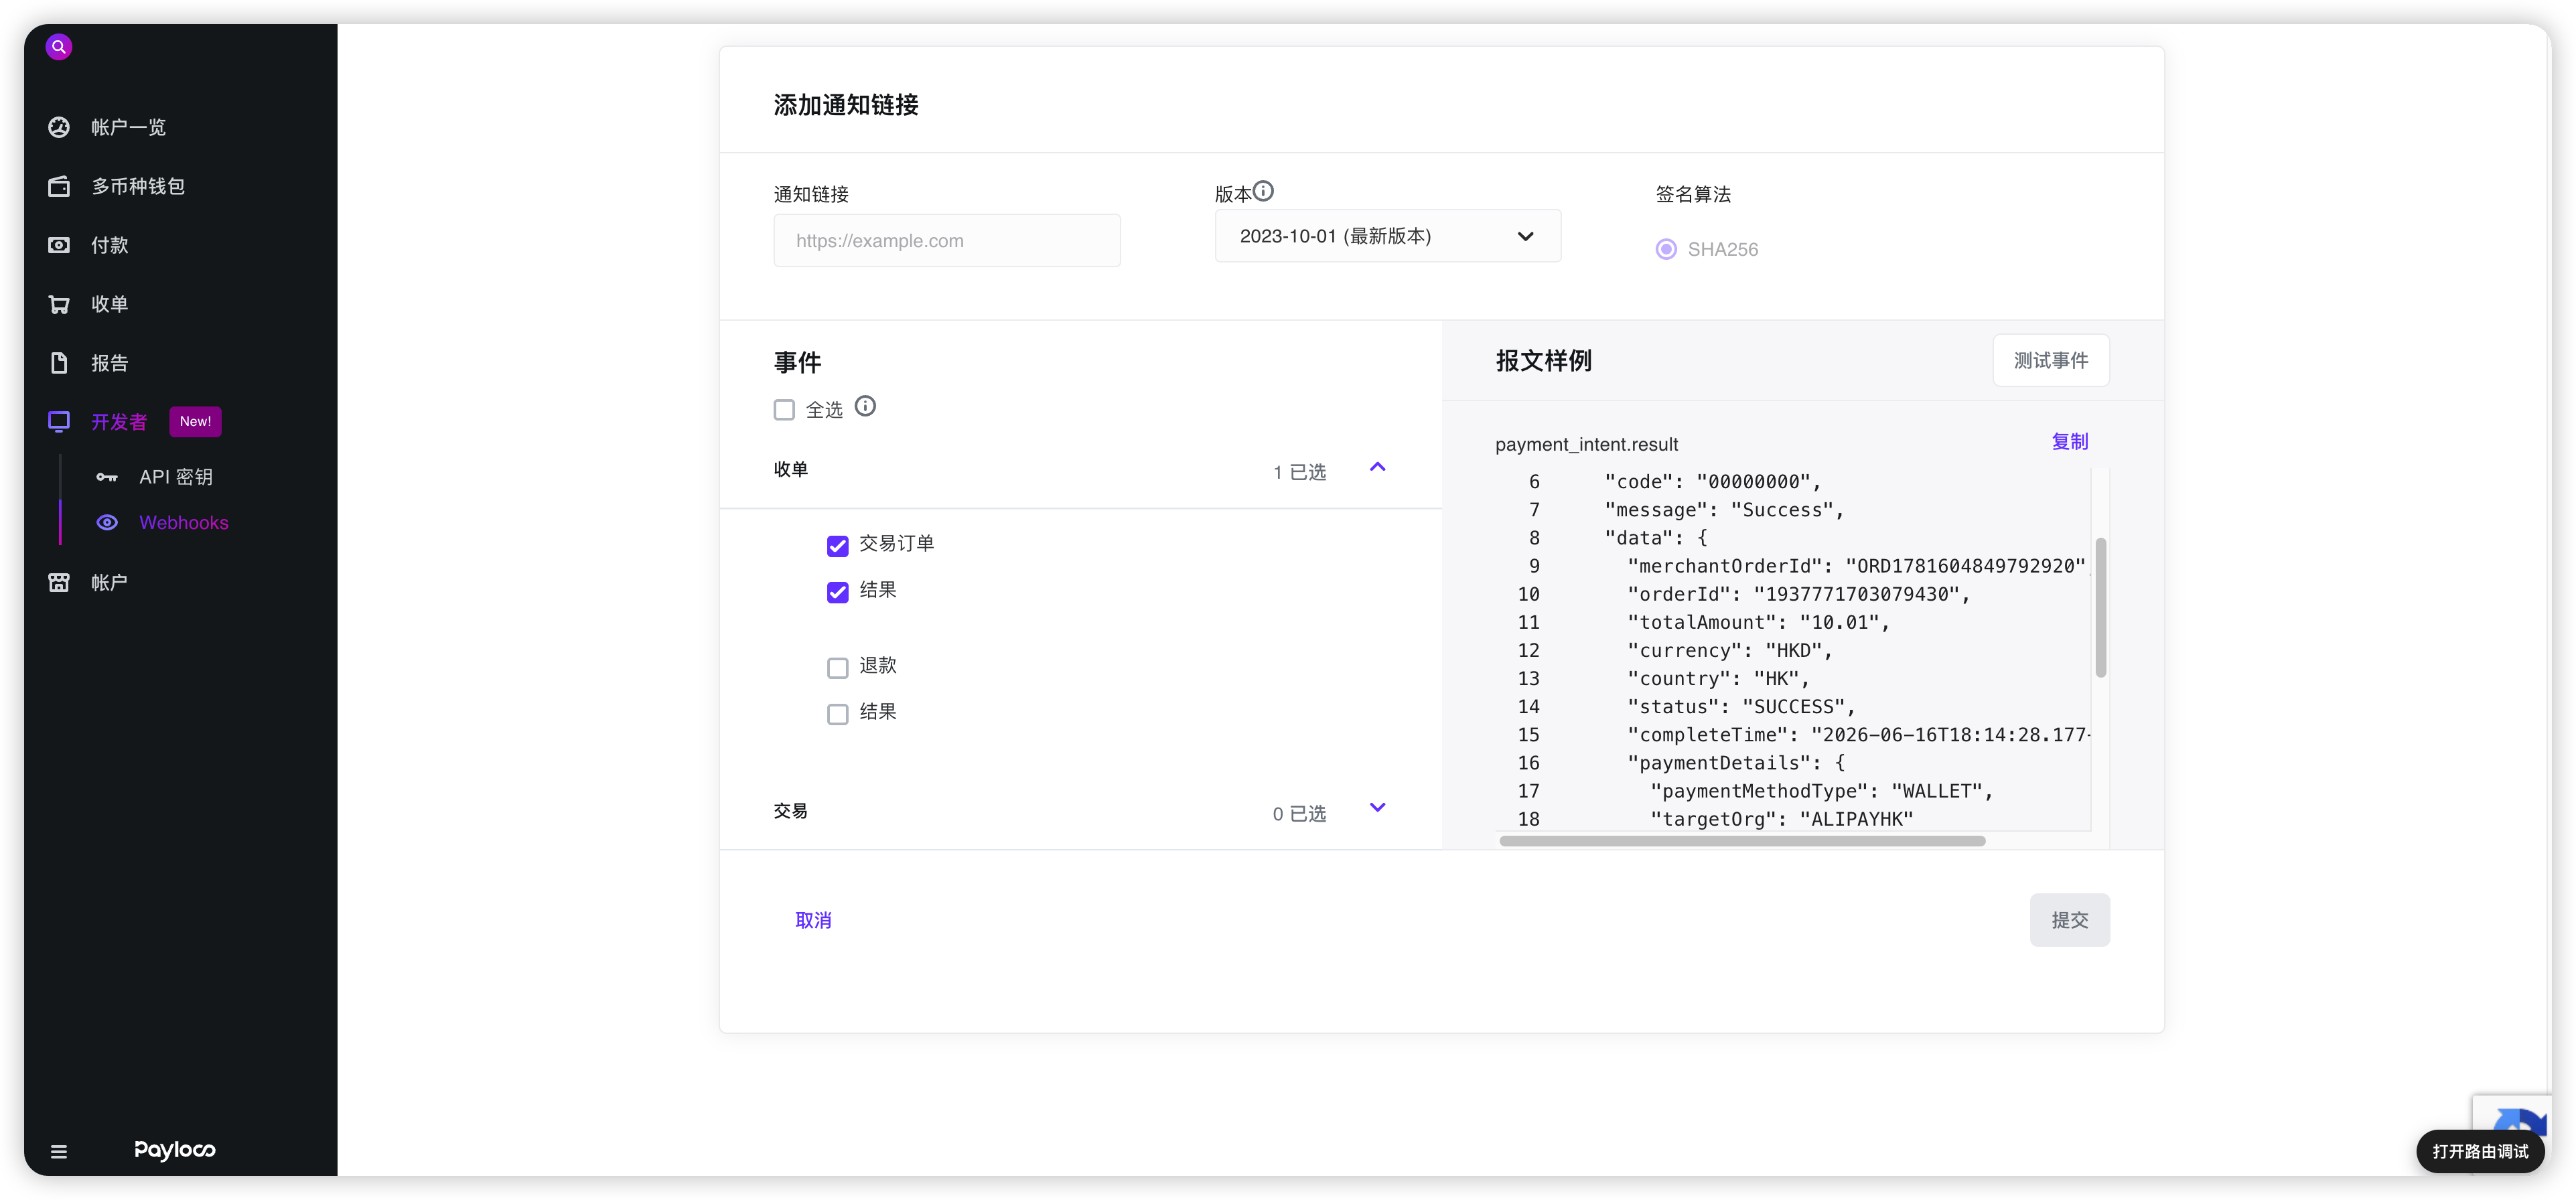 4. 选择 webhook 要监听的事件。
5. 点击 **Submit** 创建 webhook 订阅。
> **\[信息]**
>
> 你可以通过选择单个 webhook 事件预览示例负载。
## 投递头部
发送到你的 webhook 通知 URL 的 HTTP POST 有效负载包含以下特殊头部:
| Header | 描述 |
| ----------- | --------------------------------------------------------------------------------------------- |
| x-timestamp | 毫秒级 Unix 时间戳,例如 1357872222592。 |
| x-signature | 请求体的 HMAC 十六进制摘要。如果 webhook 配置了 secret,则会发送该头部。该 HMAC 摘要通过 SHA-256 哈希函数和 secret 作为 HMAC 密钥生成。 |
## Webhook 有效负载
Webhook 有效负载以 JSON 形式发送在 POST 请求体中。事件的完整详细信息包含在其中,可以在将 JSON 解析为 Event 对象后直接使用。`id` 字段对应 Web 应用中的事件 ID。
Event 对象包含以下字段:
| Field | 描述 | |
| ------------ | ------------------------------------- | - |
| `orderId` | 事件的唯一标识符。 | |
| `name` | 事件类型,例如 `payment_attempt.authorized`。 | |
| `merchantId` | 该事件所属商户的唯一标识符。 | |
| `data` | 包含随每种事件类型变化的业务信息。有关示例负载,请参阅各事件类型页面。 | |
| `notifyTime` | 事件创建时间。 | |
```json theme={null}
{
"code": "00000000",
"message": "Success",
"traceId": "85776c0dc17b4911bc38f6c24bf98504",
"merchantId": "851244000040",
"notifyTime": "2026-06-16T18:14:28.26137491+08:00",
"notifyType": "PAYMENT",
"data": {
"merchantOrderId": "ORD1781604849792920",
"orderId": "1937771703079430",
"totalAmount": "10.01",
"currency": "HKD",
"country": "HK",
"status": "SUCCESS",
"completeTime": "2026-06-16T18:14:28.177+08:00",
"paymentDetails": {
"paymentMethodType": "WALLET",
"targetOrg": "ALIPAYHK"
},
"reference": "goods reference",
"cashierCountry": "HK"
}
}
```
## 响应 webhook 事件
你的端点必须通过返回 `200 OK` HTTP 状态码和以下报文体来确认所有通知。如果 Payloco 没有收到 `200 OK` 响应(由于超时或任何其他状态码),则会将投递视为失败并重试。为防止超时,请**立即**发送响应。
```json theme={null}
{
"code": "00000000",
"message": "Success"
}
```
## 验证 webhook 签名
Payloco 会在发送到你的通知 URL 的 webhook 请求头中附加签名,以便你验证该事件确实由 Payloco 发送。
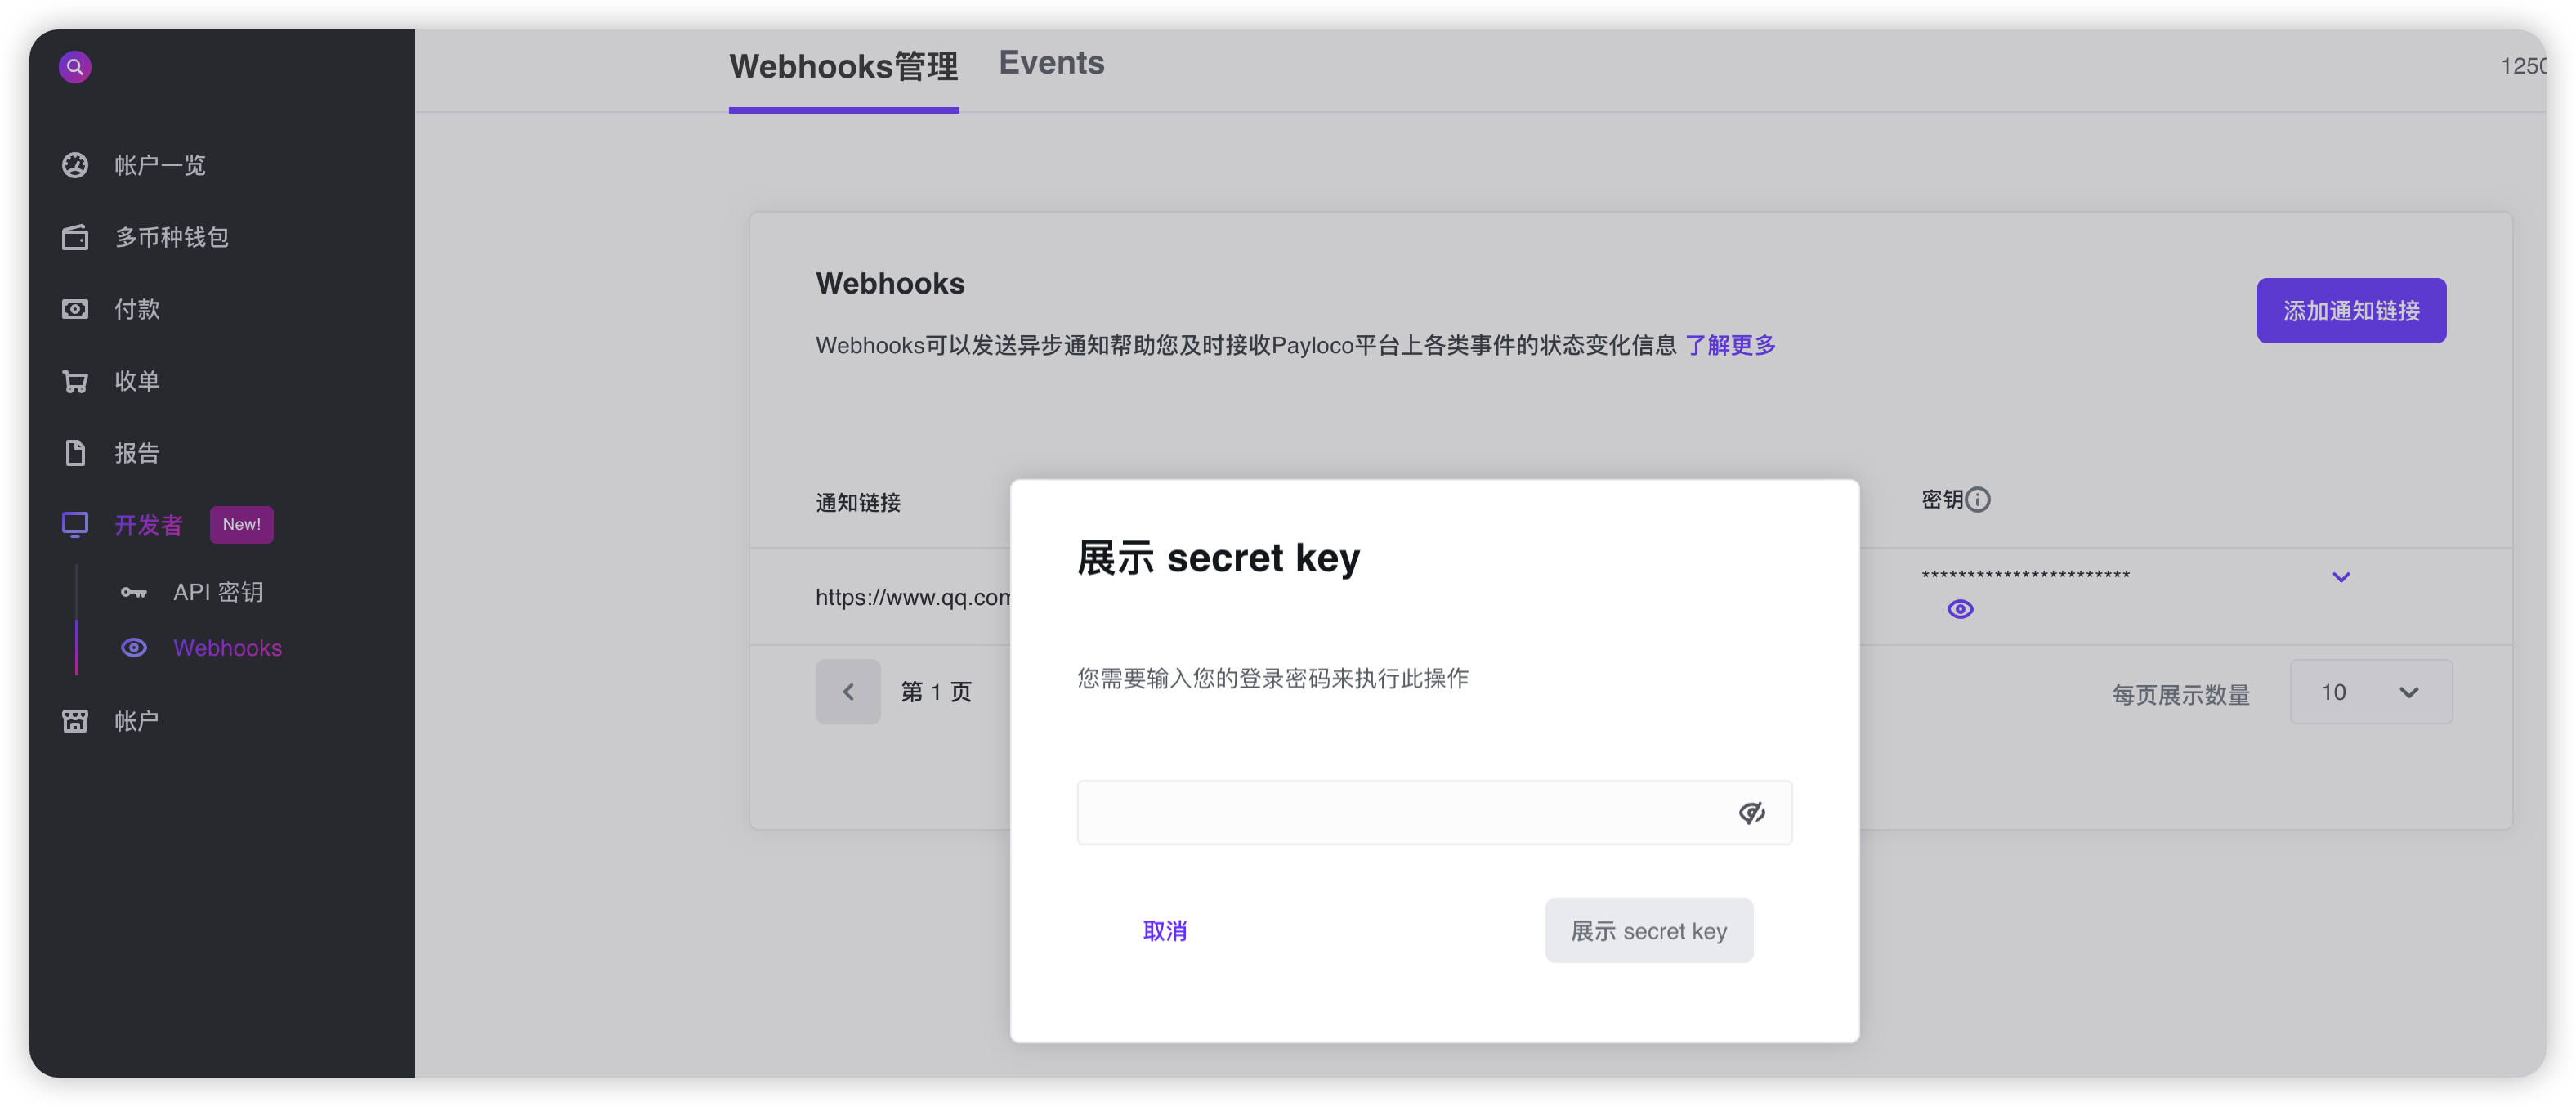
在验证签名之前,你需要从 Web 应用中检索通知 URL 的 secret key。每个 secret 都与其对应的 URL 唯一绑定。完成此设置后,Payloco 将开始对发送到该 URL 的每个 webhook 进行签名。
4. 选择 webhook 要监听的事件。
5. 点击 **Submit** 创建 webhook 订阅。
> **\[信息]**
>
> 你可以通过选择单个 webhook 事件预览示例负载。
## 投递头部
发送到你的 webhook 通知 URL 的 HTTP POST 有效负载包含以下特殊头部:
| Header | 描述 |
| ----------- | --------------------------------------------------------------------------------------------- |
| x-timestamp | 毫秒级 Unix 时间戳,例如 1357872222592。 |
| x-signature | 请求体的 HMAC 十六进制摘要。如果 webhook 配置了 secret,则会发送该头部。该 HMAC 摘要通过 SHA-256 哈希函数和 secret 作为 HMAC 密钥生成。 |
## Webhook 有效负载
Webhook 有效负载以 JSON 形式发送在 POST 请求体中。事件的完整详细信息包含在其中,可以在将 JSON 解析为 Event 对象后直接使用。`id` 字段对应 Web 应用中的事件 ID。
Event 对象包含以下字段:
| Field | 描述 | |
| ------------ | ------------------------------------- | - |
| `orderId` | 事件的唯一标识符。 | |
| `name` | 事件类型,例如 `payment_attempt.authorized`。 | |
| `merchantId` | 该事件所属商户的唯一标识符。 | |
| `data` | 包含随每种事件类型变化的业务信息。有关示例负载,请参阅各事件类型页面。 | |
| `notifyTime` | 事件创建时间。 | |
```json theme={null}
{
"code": "00000000",
"message": "Success",
"traceId": "85776c0dc17b4911bc38f6c24bf98504",
"merchantId": "851244000040",
"notifyTime": "2026-06-16T18:14:28.26137491+08:00",
"notifyType": "PAYMENT",
"data": {
"merchantOrderId": "ORD1781604849792920",
"orderId": "1937771703079430",
"totalAmount": "10.01",
"currency": "HKD",
"country": "HK",
"status": "SUCCESS",
"completeTime": "2026-06-16T18:14:28.177+08:00",
"paymentDetails": {
"paymentMethodType": "WALLET",
"targetOrg": "ALIPAYHK"
},
"reference": "goods reference",
"cashierCountry": "HK"
}
}
```
## 响应 webhook 事件
你的端点必须通过返回 `200 OK` HTTP 状态码和以下报文体来确认所有通知。如果 Payloco 没有收到 `200 OK` 响应(由于超时或任何其他状态码),则会将投递视为失败并重试。为防止超时,请**立即**发送响应。
```json theme={null}
{
"code": "00000000",
"message": "Success"
}
```
## 验证 webhook 签名
Payloco 会在发送到你的通知 URL 的 webhook 请求头中附加签名,以便你验证该事件确实由 Payloco 发送。
在验证签名之前,你需要从 Web 应用中检索通知 URL 的 secret key。每个 secret 都与其对应的 URL 唯一绑定。完成此设置后,Payloco 将开始对发送到该 URL 的每个 webhook 进行签名。
 > **\[重要]**
>
> 测试事件的 webhook 签名使用测试事件负载中 `client-secret-key` 头部提供的 secret key 生成。
你可以按以下步骤验证签名:
1. 从头部提取 **`x-timestamp`** 和 **`x-signature`**。
2. 通过连接 **`x-timestamp`**(作为字符串)和实际 JSON 有效负载(请求体字符串)来准备 **`value_to_digest`** 字符串。
3. 使用 [SHA-256](https://en.wikipedia.org/wiki/SHA-2) 哈希函数计算 [HMAC](https://en.wikipedia.org/wiki/Hash-based_message_authentication_code)。使用通知 URL 的 secret key 作为密钥,`value_to_digest` 字符串作为消息。
4. 将头部中的 **`x-signature`** 与预期签名进行比较。如果签名匹配,请计算当前时间戳与接收时间戳之间的差值,然后判断差值是否在你的容差范围内。
如果签名验证失败,请检查以下常见原因:
* **使用原始 JSON 有效负载**:计算签名时始终使用原始、未修改的请求体。不要使用解析后再重新序列化的 JSON 对象,因为这可能更改格式(空格、键顺序等),导致签名不同。
* **在解析之前验证**:许多 JSON 解析库会自动格式化或规范化 JSON 有效负载。请在解析或转换之前验证签名。
* **验证时间戳格式**:确保精确使用 header 中接收的 `x-timestamp` 值,不要进行任何转换或格式化。
* **使用正确的 secret key**:确认你使用的是与接收 webhook 的通知 URL 对应的 secret key。每个 webhook 订阅都有自己唯一的 secret key。
* **检查连接顺序**:`value_to_digest` 字符串必须按精确顺序构造,即先连接 `x-timestamp`(字符串),再连接原始 JSON payload 请求体。
### 代码示例
以下示例展示如何验证签名,并在验证成功时返回 200,验证失败时返回 400,分别使用 Java、PHP 和 Node.js。
```java theme={null}
import org.apache.commons.codec.digest.HmacAlgorithms;
import org.apache.commons.codec.digest.HmacUtils;
import org.springframework.http.HttpStatus;
import org.springframework.http.ResponseEntity;
import org.springframework.stereotype.Controller;
import org.springframework.web.bind.annotation.PostMapping;
import org.springframework.web.bind.annotation.RequestBody;
import org.springframework.web.bind.annotation.ResponseBody;
import javax.servlet.http.HttpServletRequest;
import javax.servlet.http.HttpServletResponse;
import java.util.HashMap;
import java.util.Map;
@Controller
public class WebhookExampleController {
@PostMapping("/webhook/example")
@ResponseBody
public ResponseEntity> receive(HttpServletRequest request,
@RequestBody String payload,
HttpServletResponse response) {
String timestamp = request.getHeader("x-timestamp");
String signature = request.getHeader("x-signature");
String secret = getSecret();
StringBuilder valueToDigest = new StringBuilder();
valueToDigest.append(timestamp).append(payload);
HmacUtils hmacUtils = new HmacUtils(HmacAlgorithms.HMAC_SHA_256, secret);
if (hmacUtils.hmacHex(valueToDigest.toString()).equals(signature)) {
// 签名验证成功
Map successResponse = new HashMap<>();
successResponse.put("code", "00000000");
successResponse.put("message", "Success");
return ResponseEntity.ok(successResponse);
} else {
// 签名验证失败
Map errorResponse = new HashMap<>();
errorResponse.put("code", "00000001"); // 可根据需要定义错误码
errorResponse.put("message", "failed to verify the signature");
return ResponseEntity
.status(HttpStatus.BAD_REQUEST)
.body(errorResponse);
}
}
private String getSecret() {
// TODO: 从配置中心或环境变量获取 secret
return "your-secret-key";
}
}
```
```php theme={null}
getHeaderLine('x-timestamp');
$body = $request->getBody()->getContents();
$signature = $request->getHeaderLine('x-signature');
$secret = getSecret();
// 验证签名
if (hash_hmac('sha256', $timestamp . $body, $secret) !== $signature) {
$errorResponse = json_encode([
'code' => '00000001', // 错误码可自定义
'message' => 'failed to verify the signature'
], JSON_UNESCAPED_UNICODE);
return new Response(400, [
'Content-Type' => 'application/json'
], $errorResponse);
}
// 签名验证成功
$successResponse = json_encode([
'code' => '00000000',
'message' => 'Success'
], JSON_UNESCAPED_UNICODE);
return new Response(200, [
'Content-Type' => 'application/json'
], $successResponse);
}
```
```javascript theme={null}
// Koa
const crypto = require('crypto');
const secret = '';
async function webhookController(ctx, next) {
const { headers } = ctx.request;
// 重要:使用原始 body 字符串(不要用解析后的对象)
const rawBody = ctx.request.rawBody
?? (typeof ctx.request.body === 'string' ? ctx.request.body : JSON.stringify(ctx.request.body));
const ts = headers['x-timestamp'];
const signature = headers['x-signature'];
const valueToDigest = `${ts}${rawBody}`;
const signatureHex = crypto.createHmac('sha256', secret)
.update(valueToDigest)
.digest('hex');
if (signatureHex === signature) {
// 签名验证成功
ctx.status = 200;
ctx.body = {
code: "00000000",
message: "Success"
};
// 如果后面还有中间件需要执行,可以继续 next(),但一般 webhook 不需要
// return next();
} else {
// 签名验证失败
ctx.status = 400;
ctx.body = {
code: "00000001", // 可自定义错误码
message: "failed to verify webhook signature"
};
}
}
module.exports = webhookController;
```
## 白名单 IP 地址
Payloco 通过以下 IP 地址之一发出 webhook 调用。要成功接收 webhook 调用,必须将这些 IP 加入白名单:
**生产环境**
* 47.76.49.81
* 43.154.97.39
* 47.238.131.34
**沙箱环境**
* 47.242.161.23
* 47.76.76.39
有关 HTTPS、重试、立即确认事件、处理重复事件和事件顺序的指南,请参阅 [Webhooks 概述](https://www.payloco.com/docs/developer-tools/webhooks/webhooks-overview.md)。
## 后续步骤
现在你已可以接收并验证 webhook,接下来可以:
* [查看并重新触发 webhook 事件](https://www.payloco.com/docs/developer-tools/webhooks/view-and-re-trigger-webhook-events.md),以便在 Web 应用中检查事件并重新投递。
* 按产品查看 [事件类型和负载示例](https://www.payloco.com/docs/developer-tools/webhooks/listen-for-webhook-events.md)。
> **\[重要]**
>
> 测试事件的 webhook 签名使用测试事件负载中 `client-secret-key` 头部提供的 secret key 生成。
你可以按以下步骤验证签名:
1. 从头部提取 **`x-timestamp`** 和 **`x-signature`**。
2. 通过连接 **`x-timestamp`**(作为字符串)和实际 JSON 有效负载(请求体字符串)来准备 **`value_to_digest`** 字符串。
3. 使用 [SHA-256](https://en.wikipedia.org/wiki/SHA-2) 哈希函数计算 [HMAC](https://en.wikipedia.org/wiki/Hash-based_message_authentication_code)。使用通知 URL 的 secret key 作为密钥,`value_to_digest` 字符串作为消息。
4. 将头部中的 **`x-signature`** 与预期签名进行比较。如果签名匹配,请计算当前时间戳与接收时间戳之间的差值,然后判断差值是否在你的容差范围内。
如果签名验证失败,请检查以下常见原因:
* **使用原始 JSON 有效负载**:计算签名时始终使用原始、未修改的请求体。不要使用解析后再重新序列化的 JSON 对象,因为这可能更改格式(空格、键顺序等),导致签名不同。
* **在解析之前验证**:许多 JSON 解析库会自动格式化或规范化 JSON 有效负载。请在解析或转换之前验证签名。
* **验证时间戳格式**:确保精确使用 header 中接收的 `x-timestamp` 值,不要进行任何转换或格式化。
* **使用正确的 secret key**:确认你使用的是与接收 webhook 的通知 URL 对应的 secret key。每个 webhook 订阅都有自己唯一的 secret key。
* **检查连接顺序**:`value_to_digest` 字符串必须按精确顺序构造,即先连接 `x-timestamp`(字符串),再连接原始 JSON payload 请求体。
### 代码示例
以下示例展示如何验证签名,并在验证成功时返回 200,验证失败时返回 400,分别使用 Java、PHP 和 Node.js。
```java theme={null}
import org.apache.commons.codec.digest.HmacAlgorithms;
import org.apache.commons.codec.digest.HmacUtils;
import org.springframework.http.HttpStatus;
import org.springframework.http.ResponseEntity;
import org.springframework.stereotype.Controller;
import org.springframework.web.bind.annotation.PostMapping;
import org.springframework.web.bind.annotation.RequestBody;
import org.springframework.web.bind.annotation.ResponseBody;
import javax.servlet.http.HttpServletRequest;
import javax.servlet.http.HttpServletResponse;
import java.util.HashMap;
import java.util.Map;
@Controller
public class WebhookExampleController {
@PostMapping("/webhook/example")
@ResponseBody
public ResponseEntity> receive(HttpServletRequest request,
@RequestBody String payload,
HttpServletResponse response) {
String timestamp = request.getHeader("x-timestamp");
String signature = request.getHeader("x-signature");
String secret = getSecret();
StringBuilder valueToDigest = new StringBuilder();
valueToDigest.append(timestamp).append(payload);
HmacUtils hmacUtils = new HmacUtils(HmacAlgorithms.HMAC_SHA_256, secret);
if (hmacUtils.hmacHex(valueToDigest.toString()).equals(signature)) {
// 签名验证成功
Map successResponse = new HashMap<>();
successResponse.put("code", "00000000");
successResponse.put("message", "Success");
return ResponseEntity.ok(successResponse);
} else {
// 签名验证失败
Map errorResponse = new HashMap<>();
errorResponse.put("code", "00000001"); // 可根据需要定义错误码
errorResponse.put("message", "failed to verify the signature");
return ResponseEntity
.status(HttpStatus.BAD_REQUEST)
.body(errorResponse);
}
}
private String getSecret() {
// TODO: 从配置中心或环境变量获取 secret
return "your-secret-key";
}
}
```
```php theme={null}
getHeaderLine('x-timestamp');
$body = $request->getBody()->getContents();
$signature = $request->getHeaderLine('x-signature');
$secret = getSecret();
// 验证签名
if (hash_hmac('sha256', $timestamp . $body, $secret) !== $signature) {
$errorResponse = json_encode([
'code' => '00000001', // 错误码可自定义
'message' => 'failed to verify the signature'
], JSON_UNESCAPED_UNICODE);
return new Response(400, [
'Content-Type' => 'application/json'
], $errorResponse);
}
// 签名验证成功
$successResponse = json_encode([
'code' => '00000000',
'message' => 'Success'
], JSON_UNESCAPED_UNICODE);
return new Response(200, [
'Content-Type' => 'application/json'
], $successResponse);
}
```
```javascript theme={null}
// Koa
const crypto = require('crypto');
const secret = '';
async function webhookController(ctx, next) {
const { headers } = ctx.request;
// 重要:使用原始 body 字符串(不要用解析后的对象)
const rawBody = ctx.request.rawBody
?? (typeof ctx.request.body === 'string' ? ctx.request.body : JSON.stringify(ctx.request.body));
const ts = headers['x-timestamp'];
const signature = headers['x-signature'];
const valueToDigest = `${ts}${rawBody}`;
const signatureHex = crypto.createHmac('sha256', secret)
.update(valueToDigest)
.digest('hex');
if (signatureHex === signature) {
// 签名验证成功
ctx.status = 200;
ctx.body = {
code: "00000000",
message: "Success"
};
// 如果后面还有中间件需要执行,可以继续 next(),但一般 webhook 不需要
// return next();
} else {
// 签名验证失败
ctx.status = 400;
ctx.body = {
code: "00000001", // 可自定义错误码
message: "failed to verify webhook signature"
};
}
}
module.exports = webhookController;
```
## 白名单 IP 地址
Payloco 通过以下 IP 地址之一发出 webhook 调用。要成功接收 webhook 调用,必须将这些 IP 加入白名单:
**生产环境**
* 47.76.49.81
* 43.154.97.39
* 47.238.131.34
**沙箱环境**
* 47.242.161.23
* 47.76.76.39
有关 HTTPS、重试、立即确认事件、处理重复事件和事件顺序的指南,请参阅 [Webhooks 概述](https://www.payloco.com/docs/developer-tools/webhooks/webhooks-overview.md)。
## 后续步骤
现在你已可以接收并验证 webhook,接下来可以:
* [查看并重新触发 webhook 事件](https://www.payloco.com/docs/developer-tools/webhooks/view-and-re-trigger-webhook-events.md),以便在 Web 应用中检查事件并重新投递。
* 按产品查看 [事件类型和负载示例](https://www.payloco.com/docs/developer-tools/webhooks/listen-for-webhook-events.md)。